
One of the most intimidating parts of being a copywriter/producer— especially for newbies— is the voice over session.
It doesn’t seem to matter if the voice talent is a complete freaking ogre or is as mellow as the Dalai Lama; there’s something inherently nerve-wracking about handing your script over to someone whose job it is to read scripts all day. It just feels like you’re being judged.
Plenty of producers have asked me how to get the best out of the voiceover session; there’s a more diverse discussion about that here.
For now I want to give you the absolute number one tip. And that is: layout your script properly.
Firstly, script layout only takes seconds to do; but will save you hours and hours of time in the long run. Think about it: every time your voice session stops for another take– just because the voice artist doesn’t ‘get’ something about your script– is another couple of minutes down the drain. It all adds up.
Secondly, voice artists will respect a copywriter who clearly knows what they are trying to achieve with words that have been chosen and placed thoughtfully; not to mention a producer who has taken the time to make performing easier.
Y’see, the best voice artists will read from any old scrap of paper and turn it into something inspired. The problem is that they are so good at doing this, a producer could be almost forgiven for thinking that script layout is not a big deal.
I think this is a regrettable, industry-wide error. It’s just Psychology 101 to know that any person will go the extra distance for someone who is considerate and takes pride in what they do.
Okay then… here’s how you do it.
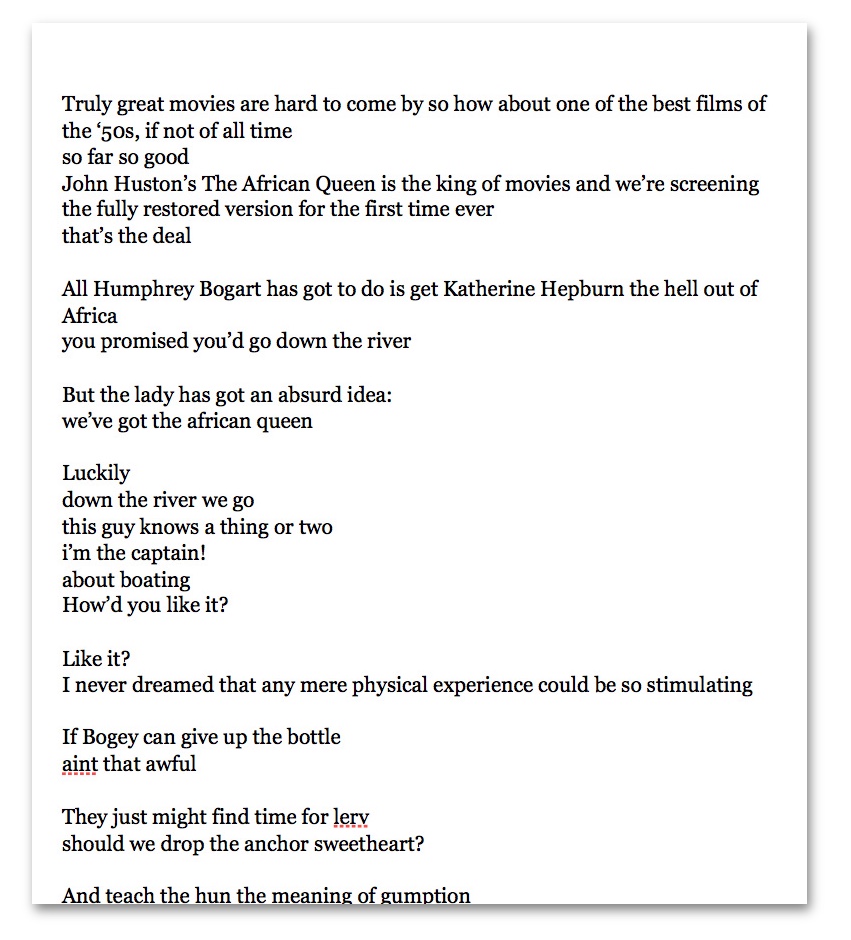
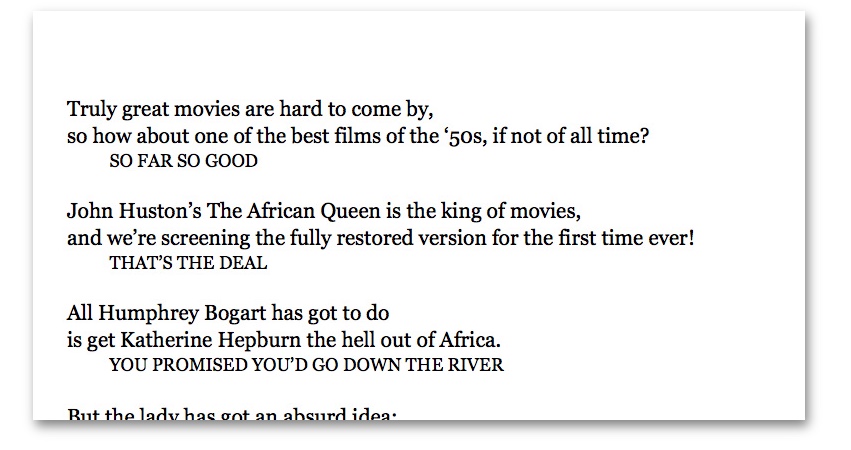
To demonstrate, I’m going to start with a standard McPromo script for the movie The African Queen. The quality of the script is not the focus of this article, the formatting is; and in promo script layout terms, the following is as bad as it gets:
Let’s see if we can punch this sucker into shape!
Tip #1: use large font sizes
Voice over booths can be dark, dingy places. Why make it any harder for the voice artist to see your script? A voice artist who has to squint isn’t going to give their best performance.
Many clients prefer authoritative voices; which naturally come from older people. As hard as it is to comprehend now, by the time you’re in your mid forties, your eyesight will clap out on you in the most humiliating fashion. So look after your eyes, and those of your voice talent with large type. A point size of 14, 16 or even 18 is the go.
Tip #2: use a good quality typeface
Personally I like Georgia because I think it’s a hard working, easy-to-read typeface, even at small sizes. I just prefer serif typefaces for text that is meant to be read aloud.
If I have to use a non-serif typeface I go for Helvetica Neue, because it also has a great selection of weights.
Tip #3: give lines room to breathe
Set the spaces between lines of text so there’s extra white space. This is another trick to makes words easier to read… especially out loud.
1.1 to 1.5 is what the setting should be.
You should now have something that looks like this:
Tip #4: clearly separate your script from soundbites
Typically, the words your voice over artist reads will sit around other elements from the production. The voice over might simply be a tag at the end of an ad. But, if you’re making a movie trailer or TV promo, the spot will go back and forth between soundbites from the show and your written copy.
I was taught to have the word SOT: next to every instance of a soundbite. SOT stands for “sound off tape” but I think using this goes a bit too far. When you think it through, the only reason why a voice artist needs to see what the soundbites are, is so they know when to start and stop reading. You can make this obvious enough by putting a paragraph break between script and soundbite; and, by formatting the soundbites differently to your script.
You can do this any number of ways just as long as you are consistent. But seeing you’ve read this far, let me show you how I do it.
I make my soundbites all upper case, indented and in a smaller font size. When I preview and log a show I write all the soundbites in upper case so they’re all ready to go.
I prefer my voice over script to be upper and lower case, as it is more expressive. It looks like this:
Tip #5: separate concepts with a carriage return
This is a kind of formatting that is unique to script layout. Basically you create a new line for each thought or concept within a long sentence. Don’t let the word processor decide where to insert the line break; you put the break where you think it should go.
This is a kind of formatting that is unique to script layout.
Basically you create a new line
for each thought or concept within a long sentence.
Don’t let the word processor decide where to insert the line break;
you put the break where you think it should go.
See the difference?
Doing this keeps the width of the sentence smaller, meaning the reader’s eyes don’t have to wander off too far before coming back to the next line. It also helps the voice over artist better know what inflections to use, and to help get the gist of what you are saying.
Longer sentences will, most likely, have two or more concepts with them.
In my African Queen script:
“Truly great movies are hard to come by”
and,
“so how about one of the best”
are separate concepts.
As I’m about to point out in Tip #6, standard punctuation dictates you would delineate these two concepts with a comma. That’s fine. But when your sentence goes over two or more lines, you should use a carriage return as well.
Depending on your word processor and how it’s set up, you may find that hitting return gives you a whole new paragraph, when really, all you want is a new line. The trick here is to use shift+return to do this.
Tip #6: punctuate, please
Never is punctuation more necessary than when words are meant to be read aloud. You can better communicate your intention with punctuation because each bit of punctuation has its own meaning.
• A full stop says: “a new thought. take a breath.”
• A comma says: “linked thought follows, take a short pause.”
• A colon says: “for example”
These are all standard and can be learnt about in any number of books or websites.
Remember, one of the important things we’re trying to achieve here is to let the script speak for itself. A full stop takes a second to implement; but having to tell the voice artist you meant for them to stop at the end of a certain word wastes time.
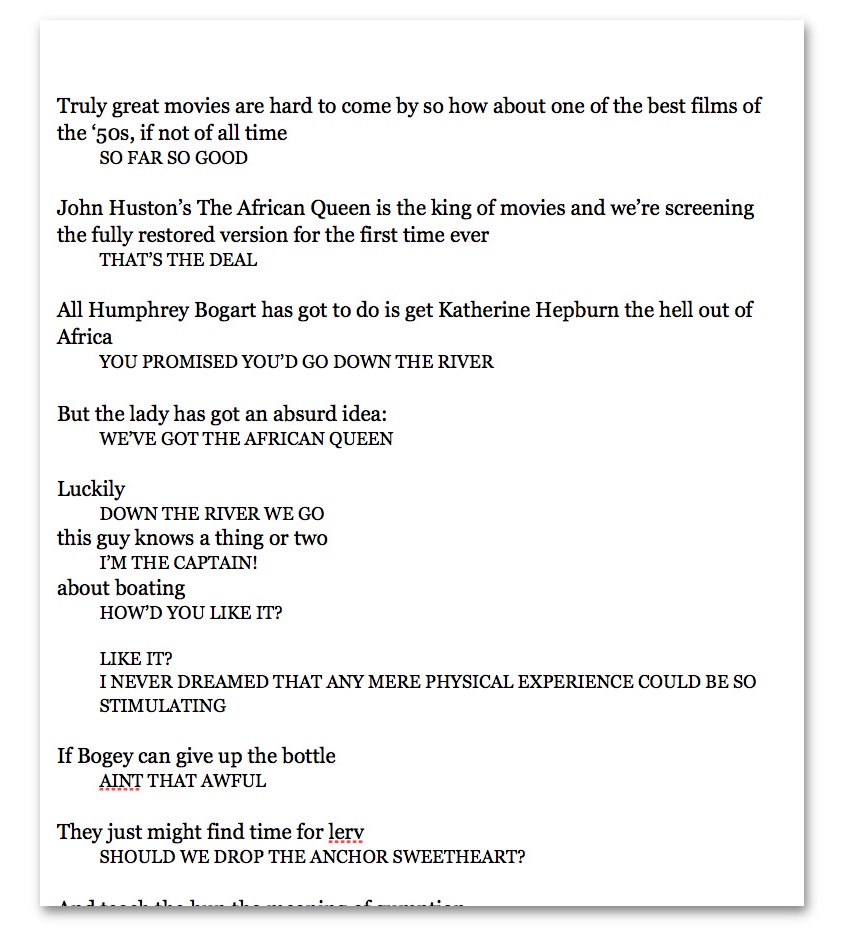
So, here’s what we have so far:
So far, this is all basic stuff. Many of you will be doing most or all of this already. Now, I want to give you some advanced and specialist punctuation tips.
Tip #7: the upward inflection
Copywriters will often split up a single sentence into two or three parts; and insert soundbites in between. I’m not a big fan of this technique; not just because it seems like obligatory padding; but because the effect can be confusing, unless the soundbites are short and relate directly to the preceding sentence fragment. (But that’s a discussion for another entry.)
In any case, you will occasionally find that sentences within a paragraph seem to mystically group themselves into bunches of threes. Or perhaps, you will find that you want to list multiple actors from the show.
In this instance, Producers (should) require that voice artists put an upward inflection at the end of all but the last sentence part, to indicate to the audience that the sentence is split and there is more to come.
I indicate an upward inflection on my scripts by using the ellipsis: three full stops in a row. In standard punctuation, an ellipsis indicates something has been omitted, but I use it to signify that an upward inflection is required.
Another way you could do this is to use bullet points, which give the script the appearance of a “shopping list” which, when you think about it, is exactly how you want the elements to be voiced. At least, the bullets indicate that the lines are linked.
Whatever you use, just stick with it; and soon the voice over person will start to know what you mean. I’m not a fan of threesomes, but if you have to use them, they should look like this:

Tip #8: emphatic formatting
If there’s one thing that separates a good voice artist from a bad one is instinctively knowing where to place inflections. The whole meaning of a sentence can be changed just by putting the emphasis on the wrong word.
Consider:
• Mary had a little lamb (as opposed to someone else having one)
• Mary had a little lamb (but now she doesn’t)
• Mary had a little lamb (but now she has more than just one)
• Mary had a little lamb (but now she has a big lamb)
• Mary had a little lamb (as opposed to some other kind of animal)
You can save heaps of time, and prove you know what you’re doing by the judicious use of bold, italic and underline formatting.
I say judicious because overuse of this technique can cause confusion, and worse, come off as patronising to professional voice talent. Just use it on the words that you really want the artist to put a little more sauce on.
My personal choice is to use bold for this task.
I reserve italics for referring to shows, magazines, objects. Like so:

On rare occasions I add underlines to words that are either linked, opposed or repeated. In my African Queen script, the formatting would look like this:
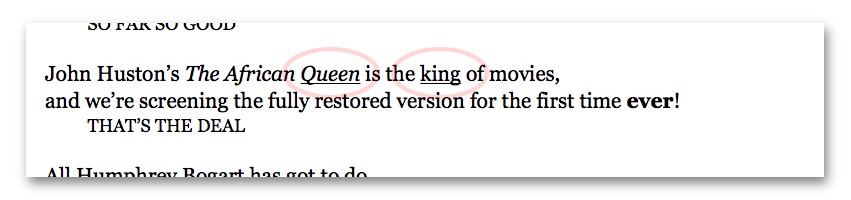
Okay, I’ll admit that this is might seem overly fussy; especially in this example where I don’t necessarily want the voice artist to put an emphasis on the linked words.
The underline here is simply to indicate a deliberate choice of word pairs.
But there are occasions when I intentionally repeat words two or more times; or, the opposed words have to be emphasised to give the sentence the correct meaning. That’s when I’ll use the underline.
Tip #9 quotes for clarification
Finally, I use “quotes” to signify that I have purposely inserted phrases, concepts or slang words that might seem unusual. In other words, I’m saying to the voice artist: “This is not a typo”.

So there you have it.
If you’re the kind of copywriter/producer whose scripts are more like the one at the very top of the page, then you might find these tips a tad daunting. But really, they are pretty easy to implement… it just takes a little practice.
Obviously, the aim here is to compose your scripts in this format as you type them; as opposed to doing what I have done here by reformatting a slab of raw text.
And once again, I want to remind you these tips are just what I do. There’s no “producer police” that decides this stuff. It’s all common sense really. The most important thing is that whatever you decide to do, be consistent about it.
Having said that, I think the difference is pretty obvious which script is easier to read. But don’t take my word for it… just for the sake of science, layout one of your scripts like I’ve shown you and see if it makes a difference. Ask your voice over artist what they think!
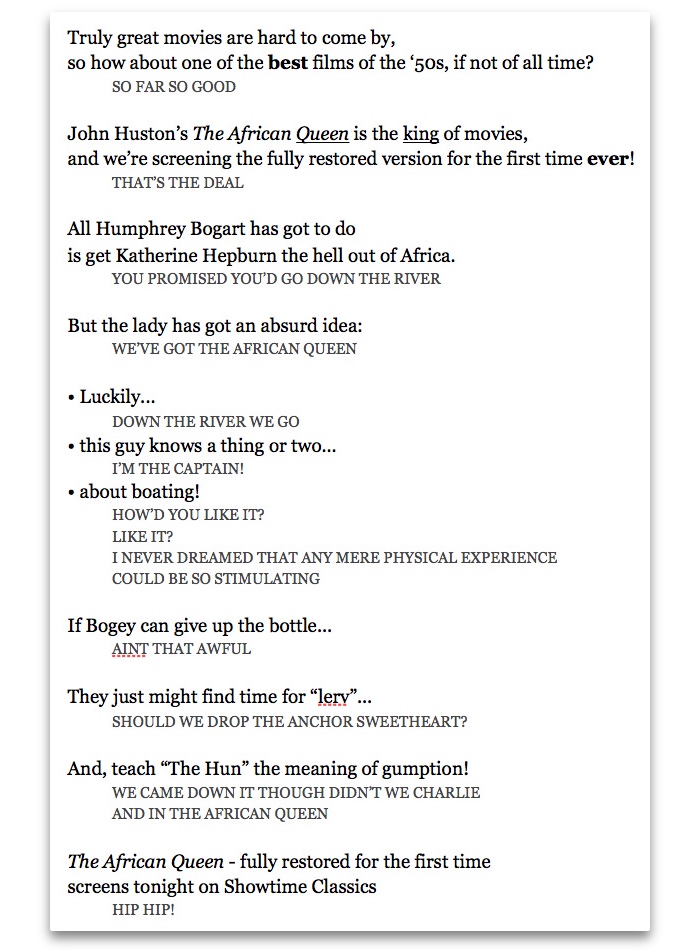
Here’s the finished product: